如何安装和使用 Hugging Face Unity API
发表于
2023年5月1日
在 GitHub 上更新中文翻译: SuSung-boy 校对: zhongdongy
本文也提供英文版本 English。
Hugging Face Unity API 提供了一个简单易用的接口,允许开发者在自己的 Unity 项目中方便地访问和使用 Hugging Face AI 模型,已集成到 Hugging Face Inference API 中。本文将详细介绍 API 的安装步骤和使用方法。
安装步骤
- 打开您的 Unity 项目
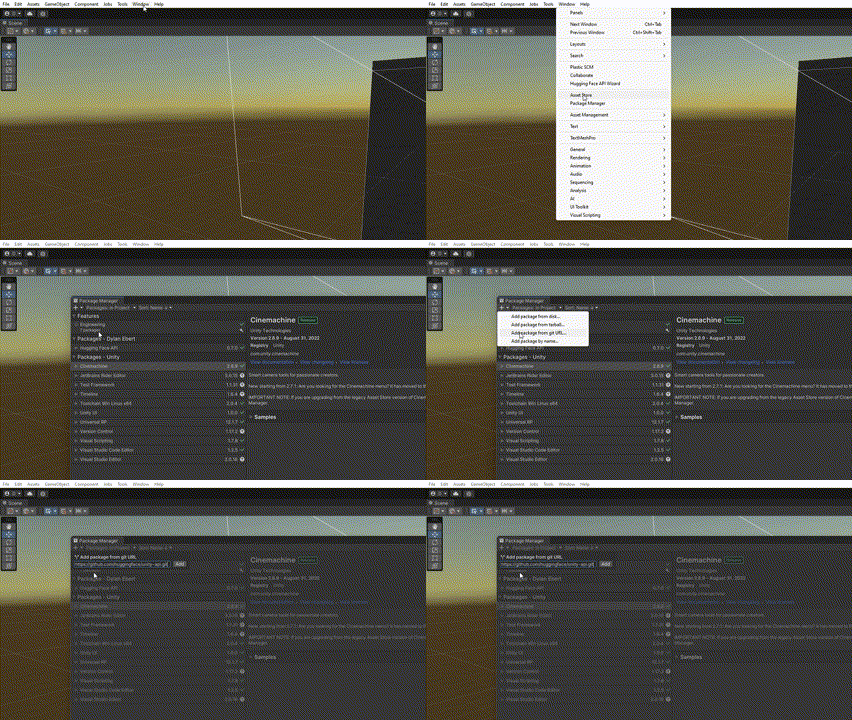
- 导航至菜单栏的
Window->Package Manager - 在弹出窗口中,点击
+,选择Add Package from git URL - 输入
https://github.com/huggingface/unity-api.git - 安装完成后,将会弹出 Unity API 向导。如未弹出,可以手动导航至
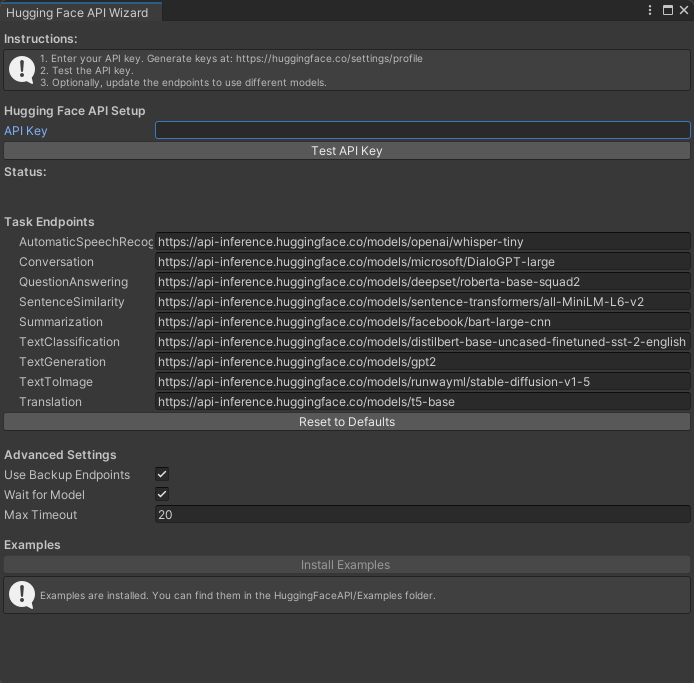
Window->Hugging Face API Wizard

- 在向导窗口输入您的 API 密钥。密钥可以在您的 Hugging Face 帐户设置 中找到或创建
- 输入完成后可以点击
Test API key测试 API 密钥是否正常 - 如需替换使用模型,可以通过更改模型端点实现。您可以访问 Hugging Face 网站,找到支持 Inference API 的任意模型端点,在对应页面点击
Deploy->Inference API,复制API_URL字段的 url 地址 - 如需配置高级设置,可以访问 unity 项目仓库页面
https://github.com/huggingface/unity-api查看最新信息 - 如需查看 API 使用示例,可以点击
Install Examples。现在,您可以关闭 API 向导了。

API 设置完成后,您就可以从脚本中调用 API 了。让我们来尝试一个计算文本句子相似度的例子,脚本代码如下所示:
using HuggingFace.API;

/* other code */

// Make a call to the API
void Query() {
    string inputText = "I'm on my way to the forest.";
    string[] candidates = {
        "The player is going to the city",
        "The player is going to the wilderness",
        "The player is wandering aimlessly"
    };
    HuggingFaceAPI.SentenceSimilarity(inputText, OnSuccess, OnError, candidates);
}

// If successful, handle the result
void OnSuccess(float[] result) {
    foreach(float value in result) {
        Debug.Log(value);
    }
}

// Otherwise, handle the error
void OnError(string error) {
    Debug.LogError(error);
}

/* other code */
支持的任务类型和自定义模型
Hugging Face Unity API 目前同样支持以下任务类型:
- 对话 (Conversation)
- 文本生成 (Text Generation)
- 文生图 (Text to Image)
- 文本分类 (Text Classification)
- 问答 (Question Answering)
- 翻译 (Translation)
- 总结 (Summarization)
- 语音识别 (Speech Recognition)
您可以使用 HuggingFaceAPI 类提供的相应方法来完成这些任务。
如需使用您自己托管在 Hugging Face 上的自定义模型,可以在 API 向导中更改模型端点。
使用技巧
- 请牢记,API 通过异步方式调用,并通过回调来返回响应或错误信息。
- 如想加快 API 响应速度或提升推理性能,可以通过更改模型端点为资源需求较少的模型。
结语
Hugging Face Unity API 提供了一种简单的方式,可以将 AI 模型集成到 Unity 项目中。我们希望本教程对您有所帮助。如果您有任何疑问,或想更多地参与 Hugging Face for Games 系列,可以加入 Hugging Face Discord 频道!

